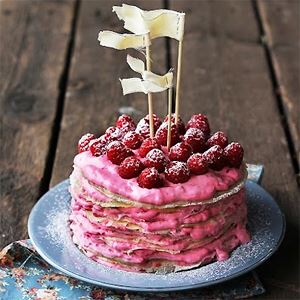
Swedish Pancake Cake
Put a fancy fresh twist on your usual celebratory cake
1 batch spiced pumpkin cake:
220g butter, at room temperature
220g caster sugar
2 large eggs
175g mashed cooked pumpkin
140g plain flour
140g self raising flour
1 tsp cinnamon
1/2 tsp nutmeg
1/4 tsp ginger
1 batch white mud cake batter:
270g butter, at room temperature
300g white chocolate
470g caster sugar
250mL milk
300g plain flour
260g self raising flour
4 eggs
White chocolate ganache:
1.8kg white chocolate
450g cream
Buttercream:
500g butter
1kg icing sugar
Gel food colouring: regal purple for the cupcake, batter and ganache, orange for the buttercream and fondant, forest green (or brown) for Jack's stalk
1 pack of orange jelly
Gum paste or fondant & CMC powder: white and black
Orange fondant
Edible black-ink pen
Sugar glue
Lollies
To make the spiced pumpkin cake:
Combine butter and sugar. Once combined, use an electric beater mix them together on high for 2-4 minutes to create a creamy mix. Add the eggs and mix on medium until clear.
Scrape down the bowl and add the mashed pumpkin. Mix on low until combined.
Sift in the flour and spices and mix on medium for 2 minutes or until clear.
To make the white mud cake:
Melt the butter in a saucepan over low heat. Add the chocolate, caster sugar and milk and constantly stir until the chocolate has also melted and the ingredients are combined.
When the chocolate mix has returned to room temperature, place it in your mixing bowl and sift flour on to the top of the liquid and mix on low until just combined. Add the eggs one at a time and mix on low speed until clear. Mix on high for 2 minutes.
To make the buttercream:
Put the butter in the mixing bowl and beat on high until the butter just starts to turn white. Add the icing sugar a little at a time. Scrape down sides regularly.
To make the ganache:
Break the chocolate into small pieces.
Place the cream into a saucepan with a heavy base and bring it to the boil stirring regularly. Pour immediately on to the chocolate and keep stirring until the chocolate has melted and it is thoroughly combined with the cream. Set it aside and allow to cool a little.
When it is close to room temperature beat it with your mixer until it becomes lighter in texture and is combined well.
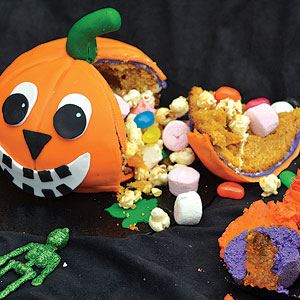
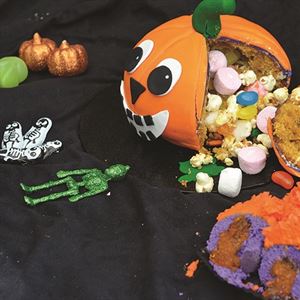
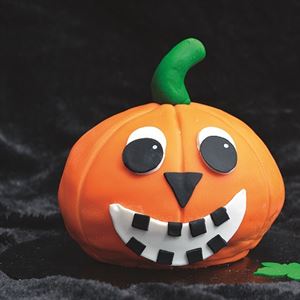
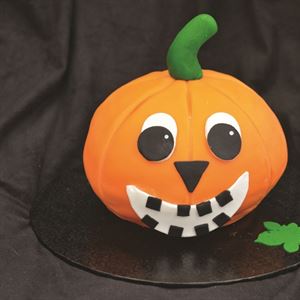
To make the lantern:
Preheat the oven to 150 C for the spiced pumpkin cake.
Grease both sides of the ball tin and place them in their ring holders on a flat cookie tray on your bench top. If you don’t have a ball tin, use oven-safe soup bowls instead.
Pour an even amount of batter into each half of the ball and place the entire tray in the oven to bake. Bake for approximately 30–40 minutes, until cooked through.
Once cooked, turn the cakes out onto a wire rack to cool, wrap in cling film (plastic wrap) and refrigerate until cold, as it is always easier to cut a cold cake.
When it comes time to trim a ball cake, I like to return it to its tin, securing it on the ring it was baking on and using a sharp bread knife and gentle sawing action, cut the top off of the cake using the top of the tin as my height guide. This will help you achieve two halves of a perfect sphere to create a real ‘ball shape’.
Using a circle cutter, mark the position of the hole in the cake, aim for the centre. Remember you don’t want the hole to be so big it destabilises the structure. Using a teaspoon, follow the cut made by the circle cutter and remove the cake centre. Repeat on the second half.
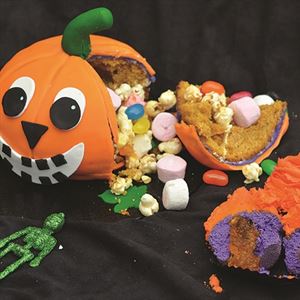
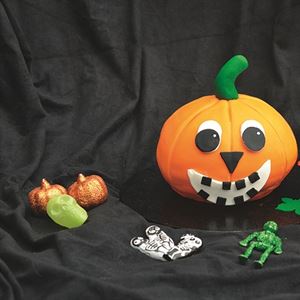
Fill both halves with lollies; I have used chocolate-coated pineapple nougat, worms, caramel popcorn, marshmallows and freckles.
Apply a small amount of chocolate ganache to the cake surrounding the holes on both sides. Stick them together by holding one sphere in each hand and gently pushing them together, starting at the bottom and quickly closing the gap to avoid lollies falling out.
Colour up the rest of the chocolate ganache bright purple and using a cranked handle spatula, apply the ganache to the cake. I start at the bottom of the cake and when the bottom one-third is done I flip it over touching only the naked cake and place it onto its display board. I then apply ganache to the rest of the cake. Allow to set before adding the fondant.
To decorate the lantern:
Colour up your white fondant orange.
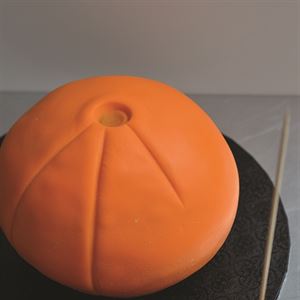
On a well dusted non-stick surface, roll out the orange fondant into an elliptical shape. Using clean, dry hands transfer the fondant onto the cake so it lies over the top (you can use the rolling pin method here, if you prefer). Once the fondant is on the cake, smooth it across the top and down the sides. Cut away any excess and smooth it in to a neat point at the base.
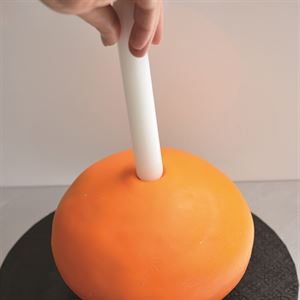
Using the end of your small rolling pin make an indent in the top of the cake, this indent will secure the stalk later, but needs to be made now while the orange fondant is still supple.
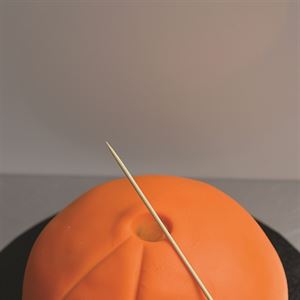
Line up a wooden skewer or dowel against the side of the cake and make a small impression in the side. Line up the bottom end of it with the base of the cake and the impression on the side and using a little bit of pressure, push it into the cake—you should now have a straight line from the base of the cake up to the side of the cake.
To continue it, line the top of the skewer with the top of the cake and the impression in the side of the cake, starting at the point of the side impression, apply pressure to the skewer, moving it upwards to indent the fondant all the way to the top. Now you have your first indent you can see how deep it should be and plan out how many you would like and how many can fit, evenly spaced around the cake. Continue this
process until you have as many segments as suits your cake.
To add the stalk, add some CMC powder to some green or brown fondant and roll it into a short, fat sausage shape. Apply some sugar glue or leftover ganache to the indent and insert the stalk, bend it over slightly to give a natural, off-the-vine look.
To make the mouth roll out a thin layer of white fondant (it doesn’t need to be gum paste), and using a little knife cut freehand a crescent shape that would indicate a smile. Apply a small amount of sugar glue to the back of the mouth and stick in place.
To make the teeth roll out a thin layer of black fondant and cut out little squares with either a square cutter or a small knife. Attach to the mouth in a random-gap-toothed manner, top and bottom. Affix them in place with sugar glue.
To make the eyes use one round cutter and an oval cutter. First roll out your white fondant and cut two oval shapes. Then, using your circle cutter, roll out your black fondant and cut two circles for the pupil of the eye. Attach the black circles at the base of the white ovals with a small amount of sugar glue. If you have edible white paint, white dust and rose spirit or batter whitener to hand, you can add white dots to the top right hand corners of the pupils to give the eye a cute look.
You can apply this as a small dot with a paintbrush, a toothpick or the tip of your Dresden or ball tools. Alternatively, you can achieve this with tiny balls of white fondant. Once you have made the eyes, attach them gently to the face.
Decide on the nose size and shape, once the eyes and mouth are in place. You may not need one at all. Roll out some white fondant and cut out a shape using a triangle cutter. Stick in place with sugar glue.
To make the cupcakes:
Preheat the oven to 120 C for the mud cake. Line the cupcake tray with cupcake papers.
Make the white mud cake batter, adding your purple food colour at the start of the mixing process.
Fill the cupcake cases three-quarters full with batter. Bake for 25–35 minutes for the mud cake, or until a skewer, when inserted in the centre, comes out clean.
Allow the cupcakes to cool and put them into the refrigerator to get cold. It is always easier to cut a cold cake.
Using an apple corer, remove the centre of each cupcake carefully and set it aside for later. Repeat this for all of the cupcakes.
Using a spoon, scoop the jelly into a piping bag fitted with a rounded tip/nozzle. Fill the core with jelly by inserting the tip as far as you can without putting pressure on the top of the cupcake and piping it in. Stop before the jelly protrudes from the top.
After the jelly has been piped, cut a small piece-off of the top of the core you removed earlier and stick it back into the cupcake to seal the jelly and protect it from the frosting.
Jelly starts to dissolve at room temperature so you want to get the cakes back into the refrigerator as soon as you can and bring them out again when you are ready to serve them for the best effect.
To decorate the cupcakes:
Make up the buttercream, colouring it orange. Scoop the buttercream into a piping bag fitted with a 2D tip/nozzle.
For the big ice cream swirl look, using a swirling motion, apply the buttercream, starting with a circle tracing the circumference of the cupcake top and spiraling in towards the centre. Repeat for a second layer, starting further in. Repeat again for a thin layer starting further in again and finally, a small swirl on top as layer four.
If the big ice cream swirl look isn’t to your taste, you can change the design, height and amount to suit.
Optional: Use brightly coloured sprinkles or add a Halloween-themed sugar topper to the cupcakes like bats or witches, if you like. For a vampire theme, pipe black food gel colouring and red jelly into the cupcakes.
Ball tin 16 x 7cm
2D piping tip (nozzle)
Round piping tip (nozzle) medium
Piping bag
Cupcake cases
Cupcake tray
Circle cutter
Oval cutter
Teaspoon
Wooden skewer or dowel
Credits: Available at all good bookstores and online from New Holland Publishers.
Photo Credits: Available at all good bookstores and online from New Holland Publishers.