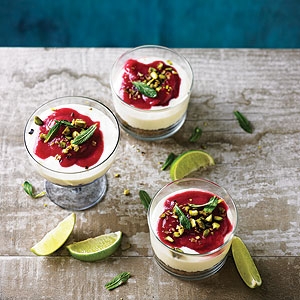
White Chocolate Mojito Cheesecake
MasterChef contestant Ben Milbourne's delicious dessert, topped with a tangy rhubarb sauce
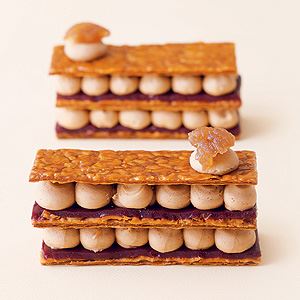
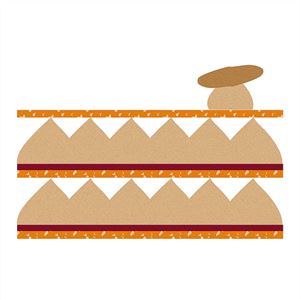

Stacks of caramelised puff pastry, with a chestnut cream and a blackcurrant jelly.
Preparation: 1 hour 30 minutes
Cooking: 20–45 minutes
Freezing: 2 hours
Refrigeration: 30 minutes
Puffy Pastry:
Preparation: 1 hour 10 minutes (détrempe, 10 minutes, two turns 20 minutes, two turns 20 minutes, two turns 20 minutes)
Cooking: 20–40 minutes
Refrigeration: 2–3 days
Détrempe
250 g plain flour
110 g water
10 g white vinegar
5 g salt
30 g butter, melted
150 g butter
Icing sugar
Chestnut Cream:
500 g chestnut paste
200 g butter, softened
Blackcurrant Jelly:
6 g leaf gelatine
250 g blackcurrant purée
30 g caster sugar
Decoration:
3 candied chestnuts
Puff Pastry:
Tips:
Be careful not to overwork the pastry. Stop as soon as the mixture is smooth, because too much elasticity means the pastry will shrink too much when it is stretched. Always cut the pastry neatly; don’t roll it into a ball. Make no more than six turns. Beyond that, the layers of pastry and butter will start to mix. When that happens, you’ll be closer to shortcrust pastry than puff pastry. To remember how many turns you’ve made, mark the pastry with your fingertips.
Derivations:
Inverse puff pastry: in controlled conditions (18°C), you can make inverse puff pastry by reversing the layers, ie: by surrounding the détrempe in the butter. You end up with more layers of butter than pastry, and the result is even crispier. Croissant dough: a yeast pastry where the butter is incorporated in the same way as for puff pastry.
Make a mound with the flour on the bench top. Make a well in the middle, then place the remaining détrempe ingredients in the well. Using the tips of your fingers, gradually incorporate the flour until you have a smooth dough. Wrap in plastic wrap and let the détrempe rest in the refrigerator for 2 hours: this allows the pastry to become more supple.
Place the 300 g butter between two layers of baking paper and tap on it with a rolling pin to make a block about 15 cm square and 1 cm thick. Leave the block in a cool place.
After 2 hours, bring the détrempe and the butter to room temperature. Wait 30 minutes before working with them. On a bench top dusted with flour, roll out the détrempe to a 35 cm square. Make sure the pastry is slightly thicker in the middle of the square, like a hill, to avoid the butter coming out the bottom.
Place the butter in the middle of the détrempe, at a 45 degree angle. Cover the butter by folding the four corners of the détrempe towards the centre. The thickness should be the same all over.
Make the first turn as follows. Roll out the détrempe evenly to make a rectangle. Always roll straight in front and away from you.
Fold this ‘pâton’ in three, like a wallet: fold the bottom third towards the top, then fold the top third down over it. Turn the pastry 90 degrees anticlockwise. The first turn is complete.
If the butter hasn’t pierced the détrempe, you can start the second turn. Otherwise, leave it in a cool place for 2–3 hours. Roll it out again, always rolling straight in front of you. Refold the pâton like a wallet then turn it 90 degrees anticlockwise. Let it rest in the refrigerator after the second turn, ideally overnight.
Do two more turns, then leave it to rest again for 3-4 hours. Do one or two more turns at the most before using.
Preheat the oven to 180°C and line a baking tray with baking paper. Roll out the pastry to 2 mm thickness. Place on the prepared baking tray and cover with another sheet of baking paper, then with another baking tray, so that the layering develops uniformly. Place in the oven. After 15 minutes, check every 5 minutes to see if the pastry is cooked. The pastry and the edges must be uniformly golden. Transfer to a wire rack to cool.
Blackcurrant Jelly:
Hydrate the Gelatine:
Leaf gelatine has been dehydrated and must be rehydrated in order to melt it into a mixture. If it isn’t hydrated well, it will absorb any missing water from the mixture itself, causing it to shrink. Immerse the gelatine in a bowl of very cold water (it melts at low temperatures). Let it soak for at least 15 minutes, then drain it and squeeze it between your hands before adding it to the mixture. Gelatine ‘glues’ mixtures together; in other words, it gives them their structure. The setting time is quite quick. Use the mixture straight away, so that the gelling power kicks in as soon as the mixture is put in place, or set it aside and whisk it before using to restore its consistency.
Bring to the boil 100 g of the blackcurrant purée with the sugar. Add the drained gelatine. Whisk and incorporate the rest of the blackcurrant purée. Line a 12 cm × 24 cm dessert frame or cake tin with baking paper or plastic wrap and pour in the jelly. Freeze for at least 2 hours.
Preheat the oven to 180°C. Roll the pastry to 2 mm thickness and cut out a 30 cm × 40 cm rectangle. Sandwich the pastry between two sheets of baking paper. Refrigerate for 30 minutes to let the pastry shrink. Remove the top layer of baking paper, and cut the pastry into 4 cm strips, then into eighteen rectangles of 13 cm × 4 cm. Don’t try to detach the pastry bands from the baking paper or they will be stretched out of shape. Put them on a baking tray and cover again with baking paper then another baking tray, so the layering within the pastry develops uniformly. Bake. After 15 minutes, check them every 5 minutes. The pastry and the sides should be evenly golden.
Once the cooking is finished, increase the oven temperature to 210°C. Dust the rectangles with icing sugar and return to the oven for a few minutes to caramelise them: check every 2 minutes – they burn very quickly. Leave them to cool on a wire rack.
Take the blackcurrant jelly out of the freezer. Remove from the frame or tin. Cut into 12 strips of 12 cm × 2 cm. Put these on the caramelised side of twelve of the puff pastry strips.
Chestnut Cream:
Put the chestnut paste in the bowl of an electric mixer and mix using the paddle attachment. Add the softened butter and whip the mixture at high speed. Put the chestnut cream in a piping bag fitted with a no. 12 plain piping nozzle. TIP: This is butter softened and worked until it takes on the consistency of a cream before being incorporated into a mixture. It helps avoid lumps and provides creaminess Cut the butter into pieces, let it soften at room temperature or soften it by applying gentle heat (without letting it melt, or it will lose its creaminess), then work it into a smooth cream using a spatula or whisk.
Pipe domes of chestnut cream on the puff pastry rectangles that are covered with jelly. TIP: Pipe the cream from a piping bag fitted with a large plain piping nozzle. Press without moving, keeping the flow as smooth as possible. Once the dome forms, stop pressing and move the nozzle to one side, to avoid creating a point.
Stack two pastry strips with filling on top of each other then finish with an empty pastry strip. Pipe a rosette of chestnut cream on each stack and top with half a candied chestnut.
12 cm × 24 cm rectangular dessert frame or cake tin
Piping bag
No. 12 plain piping nozzle
Credits: This is an edited extract from Patisserie by Melanie Dupuis and Anne Cazor published by Hardie Grant $59.99 available in stores nationally.
Photo Credits: This is an edited extract from Patisserie by Melanie Dupuis and Anne Cazor published by Hardie Grant $59.99 available in stores nationally.